

Why back up your email account?
When it comes to backing up our most valuable information oftentimes we think of our computer hard drives, photo albums, and phone contacts. Rarely do we consider or remember to back up our emails. Whether it is for personal or business matters, emails have essentially become a part of our everyday lives - so why is it not as common to backup our emails as it is our hard drives? Well, it should be. Here are a few reasons why:
Email Provider Reliability
Web Host Migration
Offline Access
How to Backup your Emails / Migrate emails to another hosting solution:
Forwarding to new email | Forward/download on local machine
Forwarding emails to a new/temporary email
Forwarding emails to a new/temporary email is a simple and effective solution to backup/migrate your emails (although emails are not stored locally). If your current email service provides forwarding and POP3 (Post Office Protocol) or IMAP (Internet Message Access Protocol) it is simple to setup. Here’s how:
Note: In the event you’re in the middle of transition to a new hosting solution, you can setup an email for temporary storage and forward your emails (again) once you’ve activated your new hosting email.
For this tutorial we’ll be using a Gmail account interface (old email) to migrate to another Gmail account (new email). These steps are essentially the same throughout other web-based email providers but the locations of settings may vary.
1. Login to your old/current email that you’ll be forwarding or backing up.
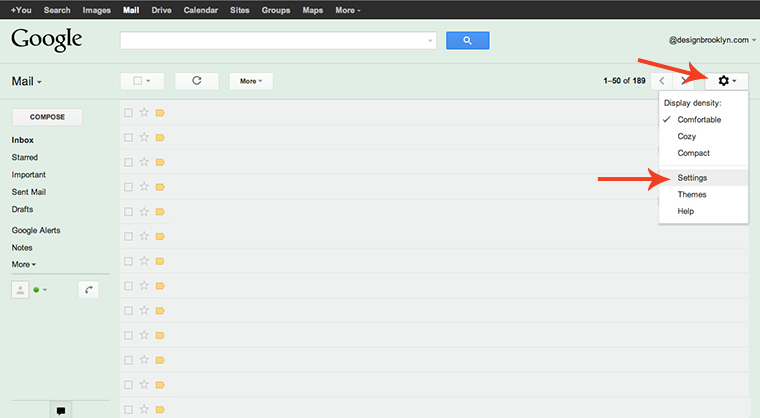
2. Locate the “gear” icon in the upper right and select Settings.
3. Locate and select the Forwarding and POP/IMAP tab.
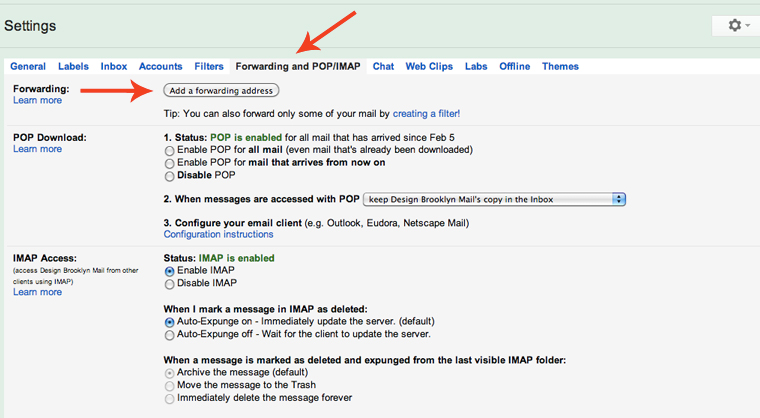
4. If you wish to only forward emails from this point forward (excluding any email that is currently and previously on your account), you can simply setup forwarding by selecting the Add a forwarding email address button. Follow the simple instructions and you'll be done. Note that Gmail and some other services will require you to confirm the forwarding address. If you wish to forward/download all your mail, continue reading.
5. Select Enable POP for all mail in the POP download section.
Note: Gmail only allows email import through POP3, so we'll be using POP3 for this tutorial. With other providers please choose the format which is most applicable.
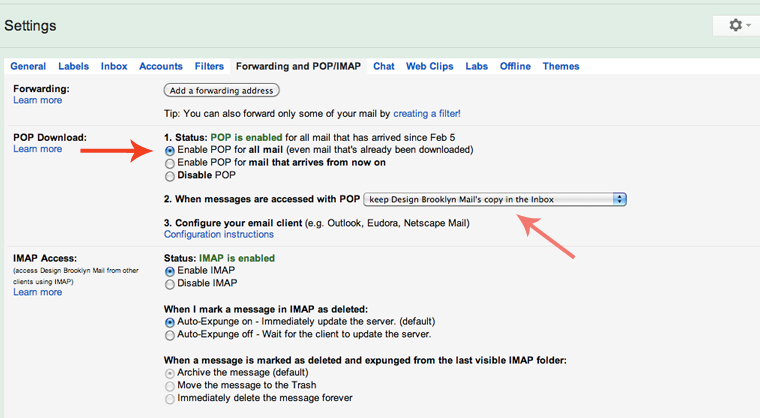
Additionally: You can decide how to treat emails that have been forwarded/downloaded and how they’ll appear on your web-based interface from the drop down next to When messages are accessed with POP. It's important NOT to select delete copy if you're using for backup purposes.
Note: Some providers DO NOT have the feature of keeping copies of emails downloaded through POP on their mail server. Please make sure this isn't the case if you're using POP for backup purposes.
6. Save Changes.
7. Log out of your current email and login to your new or temporary email (sign up for one if you haven’t already).
8. Go to the settings menu. “Gear” icon > Settings.
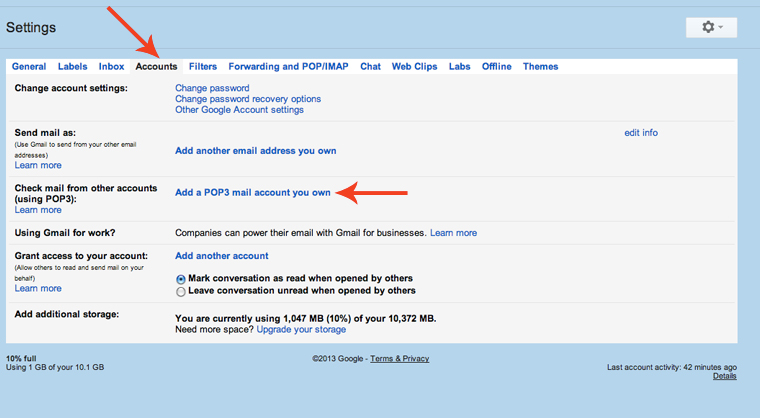
9. This time we’ll select the Accounts tab.
10. Select Add a POP3 mail account you own in the Check mail from other accounts (using POP3) section.
11. A new window should pop-up. Fill out the required information. It should look relatively similar to these settings:
.jpg)
.jpg)
12. Add Account, and you’re all set. Slowly but surely all the emails from your previous email account will be imported to this new/temporary email (depending on the amount of emails, this can take hours or even days).
Note: If you were importing to a temporary email for host migration follow the same procedures to forward to your new web hosting email once that is setup.
Forward/download emails locally (using Thunderbird)
![]()
If you would like to keep a local copy of all your emails, using client-based software like Thunderbird or Outlook is a great solution. Using POP3 (Post Office Protocol) or IMAP (Internet Message Access Protocol), client-based software can download copies of your emails for storage on your local computer. Now emails are accessible to you online or offline on your local computer.
Note: For this tutorial we’ll be using Thunderbird. These steps are essentially the same throughout other client-based software but the locations of settings may vary.
1. Login to your old/current email that you’ll be forwarding or backing up.
2. Locate the “gear” icon in the upper right and select Settings.
3. Locate and select the Forwarding and POP/IMAP tab.
4. Select Enable POP for all mail if you're using POP or Enable IMAP if you're using IMAP.
Note: Both POP and IMAP are compatible with most client-based software for backup purposes. POP provides a 1-way communication with mail servers, downloading emails to your local machine. Any edits through POP are only reflected on your local copy. While IMAP provides a 2-way communication, edits are reflected on the mail server as well as locally. IMAP is generally recommended for users of multiple devices - edits to emails are seen as the same on all connecting devices. Please choose the most appropriate protocol for each individual situation.
.jpg)
Additionally: You can decide how to treat emails that have been forwarded/downloaded using POP3 and how they’ll appear on your web-based interface from the drop down next to When messages are accessed with POP. It's important NOT to select delete copy if you're using for backup purposes.
Note: Some providers DO NOT have the feature of keeping copies of emails downloaded through POP on their mail server. Please make sure this isn't the case if you're using POP for backup purposes.
5. Save Changes.
Moving over to Thunderbird
6. If you haven’t already, please install Thunderbird before continuing. Please update to the latest version if you have an older version installed.
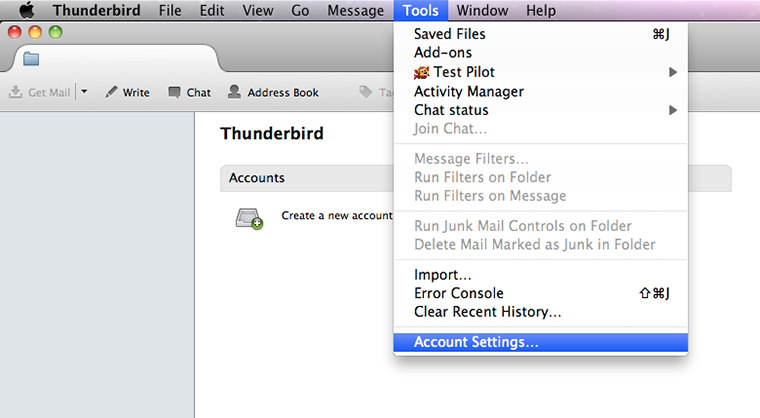
7. Go to Tools > Account Settings if you weren't prompt to do so upon installation.
8. Under Account Actions > Add Mail Account.

9. Fill out all the required information. Click Continue and Thunderbird will attempt to configurate your settings to match the email provided.
Remember to choose the appropriate mail protocol that you'll be using (POP or IMAP).
Note: If you have 2-step authentication activated for your email, remember to enter the appropriate password needed for third-party applications (this may or may not be the password you use to login through a web-based interface).
.jpg)
If Thunderbird cannot determine the appropriate settings, click Manual config and input the appropriate information provided to you by your email service provider.
.jpg)
10. Click Done.
11. Next, you want to make sure Thunderbird is set to store emails locally. While still in the Account Settings page, navigate to Synchronization & Storage under your newly added email address. Make sure Keep messages for this account on this computer is checked.
.jpg)
Click OK and we're finished setting up.
12. Now click Get Mail and all your previous emails will download to your local computer (this may take some time).
.jpg)
We'll be more than glad to help with any questions you have.
<