

"Give credit where credit is due."
Are you frustrated with uploading an image you created to find it hours later on another website - and it isn't credited to you? If so, digital watermarking may be the ideal solution for you. Digital watermarks are essentially a signature or mark added to an image to signify the author or creator - giving credit where credit is due.
FAQ
Who might be interested in using watermarks?
Anyone can add watermarks to their images - commonly, artist and content creators would be most interested.
What are benefits of using watermarks?
Other than giving credit, watermarks are a good way of marketing and directly traffic to other locations like websites and social media profiles.
What are some general tips on watermarking?
We recommend using watermarks in a discreet manner - for example using transparency and placement in less noticeable areas. Typically, you do not want to distract viewers or create focus on the watermark itself.
I want to fully protect my images, what can Ido?
If someone wanted to use your images and discredit you - they will find a way. There are methods for better protection but there isn't a 100% fool proof method. One method to consider is to make your watermark more prominent.
Tutorial
For this tutorial we will be using Adobe Photoshop CS5 to watermark our images. The guidelines aren’t restricted to but will be shaped around Photoshop. There are a number of other software titles that can achieve similar results. The general idea and procedures are the same across each software title. Continue to the bottom for a list of software suggestions.
1. First open the image you want to watermark. Make sure both the Layers and Tools windows are opened.
.png)
2. For this tutorial we will use a © symbol with our watermark. To create a © symbol you need to use the Custom Shape Tool. After selecting the Custom Shape Tool locate the © symbol in the Shape menu.
.png)
.png)
3. Simply click and drag your cursor on the image where you want the symbol.
Holding the SHIFT key while dragging will help keep an even shape.
Alternatively, you can use unicode in a text layer to create a©symbol. Hold down ALT and press 0169forWindows orOption+GforMac.

4. Next you want to add text to your watermark. Locate the Text tool or press T on your keyboard.
.png)
5. Add text accordingly. We recommend using your name or brand's name. We will use DesignBrooklyn for this tutorial.
.png)
6. With the Shape layer selected, hold SHIFT and click the Text layer to highlight both layers.
.png)
.png)
.png)
7. Using the Opacity selector change the opacity accordingly so that the watermark isn't too distracting.
.png)
Congratulations - your image is now watermarked.
Optional steps:
For watermarks that are less prone to cropping but will appear more prominent in images follow these additional steps.
Note: We generally do not recommend watermarking using this method. In situations like watermarking stock images for sales this may be an appropriate choice.
8. Navigate to Edit >Free Transform.
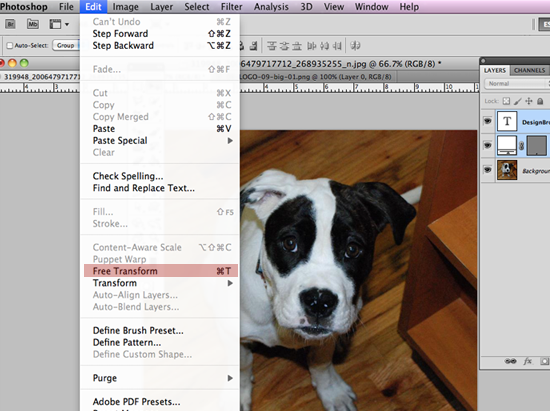
9. Using the Free Transform tool - rotate, enlarge, and reposition your watermark.
.png)
.png)
10. Position the watermark accordingly and adjust the Opacity to your liking.

Congratulations - your image is now watermarked.
Software suggestions:
Adobe Photoshop or Photoshop Elements (cross platform)
GIMP (cross platform)
Corel PaintShop Pro (Windows)
Paint.NET (Windows)
Seashore (Mac)